Running Rust natively in AWS Lambda and testing it locally
Hi, dear reader!
EDIT: It is now possible to run Rust in AWS Lambda, making this tutorial obsolete. Thank you for reading!
Today I‘ll show you a way of running Rust in AWS Lambda without incurring in the performance penalty caused by interacting with JavaScript or Python, while allowing you to test the changes locally.

The goal of this post is to develop a Lambda function that creates a thumbnail given an image, showcasing not only the use of native Rust in AWS Lambda Functions but also the ability to test the program locally.
This tutorial uses rust-aws-lambda, a crate for writing AWS Lambda functions in pure Rust. For local testing, we’ll be using the Go image from docker-lambda which allows us to run Go (and Rust) binaries, while simulating the Lambda environment.
This project [rust-aws-lambda] forgoes embedding and instead leverages lambda’s official Go support. (…) Lambda does not care that the Linux binary it runs is written in Rust rather than Go as long as they behave the same.
Setup
In order to be able to compile Rust executables, the x86_64-unknown-linux-musltarget alongside musl-gcc must be installed. The target can be installed using rustup:
$ rustup target add x86_64-unknown-linux-musl
Depending on your operating system, your installation steps for musl-gcc may vary. On Ubuntu, you can use $ apt-get install musl.
That’s all that is need to compile the program. In case you want to test the binary locally, you should also have Docker installed.
Hello, World!
The crate rust-aws-lambda provides the abstraction for building simple AWS Lambda functions and functions with API Gateway integration. We’ll be using the second in order to mirror a real-life scenario.
The simplest program can be written as follows:
extern crate aws_lambda as lambda;

fn main() {
    lambda::gateway::start(|_req /* API Gateway Request */| {
        let res = lambda::gateway::response() // Construct API Gateway Response
            .status(200)
            .body(lambda::gateway::Body::from("Hello, World!"))?; // Convert String to Body

        Ok(res) // Return response
    })
}
lambda::gateway::starttakes a closure that will be actually run;_reqrepresents the API Gateway request and has fields like the request’s header and body;lambda::gateway::responseis a response builder that mimics the API Gateway HTTP response.
Running
Having met the requirements, running the program is done in two steps: compilation and running.
- Compilation can be made using cargo and the target defined above, as follows:
$ cargo build --target x86_64-unknown-linux-musl - In order to run the compiled binary, we have to use the docker-lambda image:
docker run --rm -v "$PWD":/var/task lambci/lambda:go1.x <path-to-compiled-executable>

Program Flow
We will now define the full program flow and how our function will work.
- The API Gateway receives a JSON where the
bodykey maps to the base64-encoded image, as shown by the template:
{
  "body": "<base64-encoded-image>"
}
- The function extracts the body from the request as a
&str:
fn main() {
    lambda::gateway::start(|req| {
        let base64_image: &str = req.body().as_str()?;

       //...
    })
}
- Decodes the base64 image and loads the result into a
[DynamicImage](https://docs.rs/image/0.20.1/image/enum.DynamicImage.html).DynamicImageis an enum with the variousColorTypeand pixel size variations (that represents how the content is laid out) and contains useful image transformation functions, which we will be using;
fn main() {
    lambda::gateway::start(|req| {
        let base64_image: &str = req.body().as_str()?;

        let image: Vec<u8> = base64::decode(base64_image)?; // Decode base64 image

        let image: DynamicImage = load_from_memory(&image)?; // Convert image into `DynamicImage`

        // ...
    })
}
- Create a 128x128 thumbnail from the given image:
fn main() {
    lambda::gateway::start(|req| {
        //...
        let image = load_from_memory(&image)?;

        let thumbnail = image.thumbnail(128, 128); // Create the 128x128 thumbnail

        // ...
    })
}
- Encode thumbnail as PNG, and then as base64:
fn encode_png_image(image: DynamicImage) -> Result<Vec<u8>, ImageError> {
    let mut result: Vec<u8> = Vec::new(); // Creates the output `Vec<u8>`

    image.write_to(&mut result, ImageOutputFormat::PNG)?; // Writes `image` to `result` as a PNG

    Ok(result)
}

fn main() {
    lambda::gateway::start(|req| {
        //...

        let thumbnail = image.thumbnail(128, 128);

        let encoded_thumbnail = encode_png_image(thumbnail)?; // Encode image as PNG
        let encoded_thumbnail = base64::encode(&encoded_thumbnail); // Encode PNG as base64

        //...
    })
}
- Return the response, with the correct status code:
fn main() {
    lambda::gateway::start(|req| {
        //...

        let encoded_thumbnail = encode_png_image(thumbnail)?;
        let encoded_thumbnail = base64::encode(&encoded_thumbnail);

        let res = lambda::gateway::response() // Create a response
            .status(200) // Set HTTP status code as 200 (Ok)
            .body(lambda::gateway::Body::from(encoded_thumbnail))?; // Convert the encoded_thumbnail to

        Ok(res)
    })
}
This step finalizes the program flow. You can see the final code here. Now, we just need to test our code!
Testing locally
Testing a production Lambda Function while still developing involves uploading the handler multiple times, which creates a big feedback loop between the writing of the code and the testing of that code. In order to solve that, we are going to use docker-lambda. It provides an environment similar to AWS Lambda Function’s so that we can test the code in our own computers.

First of all, we need to compile our new code, which is done as follows:
$ cargo build --target x86_64-unknown-linux-musl
Then, image must be converted into the format our function is expecting:
{
  "body": "<base64-encoded-image>"
}
You can use the tools you want, but I have used the shell command base64 <image> to encode the image as base64, and then manually create the JSON structure above. I recommend you save the file into something like photo.json.
Once that is done, we are ready to test our function. We will use the following command:
$ cat <image.json> | docker run --rm -v "$PWD":/var/task -i -e DOCKER_LAMBDA_USE_STDIN=1 lambci/lambda:go1.x <path-to-compiled-executable>
The -i -e DOCKER_LAMBDA_USE_STDIN=1 arguments order the Docker image to receive the API Gateway request from the stdin, and using cat with the pipe will redirect the JSON we created earlier into the standard input of the Docker container.

If you run the command above, you’ll see some JSON being spit out of the standard output with a huge body. That’s our thumbnail encoded in base64, so we now have save it into an image.
Again, you can use any tools you want to extract the image, but I’ll use some shell commands so help us out. First, we’ll need to obtain the body field of the JSON object, which we can do using [jq](https://stedolan.github.io/jq/). Then, we’ll decode the image, which is in base64, and save it into its own PNG file. The final command looks like this:
$ cat <image.json> | docker run --rm -v "$PWD":/var/task -i -e DOCKER_LAMBDA_USE_STDIN=1 lambci/lambda:go1.x <path-to-compiled-executable> | jq -r .body | base64 -d > thumbnail.png
If you now open thumbnail.png, you should see something like this:

Uploading to AWS
After having confirmed your function works as expected, you can now upload it to AWS Lambda. When creating a new function, don’t forget to set the runtime to “Go 1.x”, otherwise it will not work.
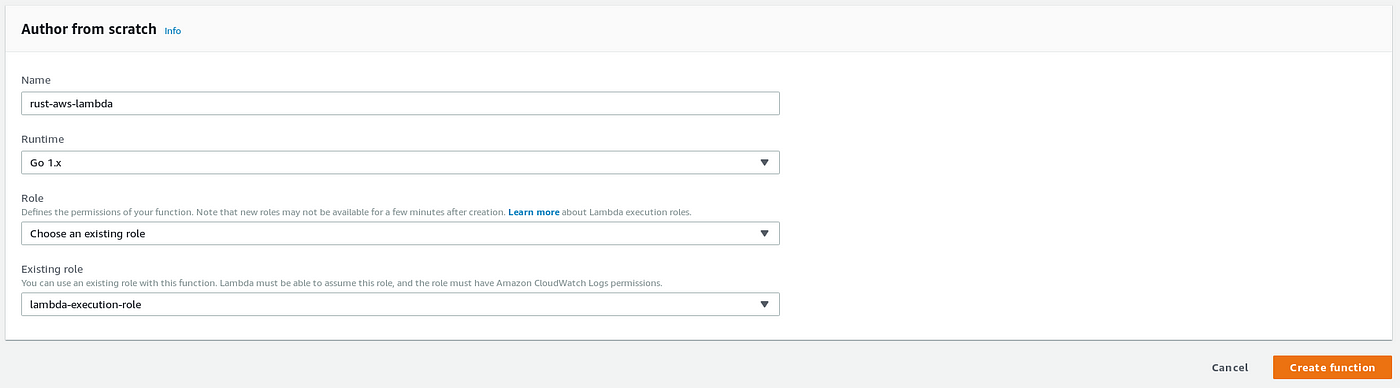
When created, you can upload the handler, which is a zip file with the Rust executable and try it out for yourself! If you compile with the --release flag, the function takes around 600ms; using the debug build takes around 15 seconds.
In order to actually test our Lambda Function, we’ll create a test event, following the structure defined earlier. This is what is looks like:

After creating the event, you can run it by clicking “Test” on the upper right corner of the screen. Wait a bit until the function finished and you should have the expected result!

You can check the result body decoding the body of the response, using base64 -d <path-to-base64-encoded-file> and check the final thumbnail!
Congratulations! You have finished the tutorial! 🎉🎉
The code and image are available in this GitHub repository.
Thank you for reading this post! I hope it was useful and I would really appreciate some feedback, especially in case you see something missing, unclear or wrong.
👋
Thanks to u/chrisoverzero for letting me know that you can use jq -r .body instead of jq .body | cut -d '"' -f 2.
About the author
Hey, I'm Bernardo, a software engineer currently living in Porto.
I enjoy building web applications using React and TypeScript.
Comments
Join the discussionNo comments yet. Be the first to comment.